

对象检测是一种计算机视觉技术,可在数字图像或视频中识别/定位给定类别的对象实例,例如人类、建筑物或车辆。对象检测已用于多种计算机视觉任务,包括图像注释、人脸检测、对象跟踪、活动识别和车辆计数。
二、准备工作
您将需要以下内容:
- 正确安装和配置的 Python 工具链,包括 pip(Python 版本 >= 3.8)
- 安装了最新版本的 Protobuf for Python
三、对象检测的工作原理
对象检测通常通过生成输入图像的小段来执行,特征提取用于验证该段是否为有效对象,并将重叠的段框组合成单个边界矩形。
对象检测通常有两种方法 – 非神经网络和基于神经网络的方法。非神经方法包括:
- Viola-Jones对象检测框架 – 基于最初提出的用于人脸检测的 Haar 功能,但可以扩展到其他对象检测。通过计算两个相邻矩形区域的像素强度并找到总和之间的差异,可以捕获图像部分的特征。
- 定向渐变直方图(HOG)特征 – 此方法是一种特征描述符,用于计算图像局部部分中梯度方向的出现次数。HOG 特征描述符不仅关注对象的结构或形状,还可以提供边缘方向。渐变方向以局部部分计算 – 通过将图像分解为较小的区域,并为每个区域计算渐变和方向。此方法适用于行人检测。
- 尺度不变特征变换(SIFT)– 涉及检测图像中的关键点(局部特征)。从参考图像中提取一组对象关键点并存储在数据库中。通过将新图像中的特征与数据库单独比较来识别新图像中的对象。匹配特征是根据其特征向量的欧氏距离找到的。SIFT 还有一个额外的优势,因为它不受图像大小或方向的影响。
基于神经网络的对象检测通常涉及从头开始设计和训练神经网络架构,或者利用已经使用自定义数据集在大型数据集上训练的预训练网络(称为迁移学习)。迁移学习是一种重用从解决问题中获得的先前知识并将相同的知识应用于单独但相关的问题的方法。神经网络方法包括:
- YOLO– 是一个最先进的实时对象检测系统,通过将单个神经网络应用于整个图像来工作。神经网络将图像拆分为单独的区域,并预测每个区域的边界框和概率。边界框由预测概率加权。YOLO 非常快,因为它只遍历一次图像。
- 基于区域的卷积神经网络(R-CNN) – 使用区域建议通过选择性搜索算法定位图像中的对象。CNN 提取特征,输出密集层由从图像中提取的特征组成,馈送到 SVM 中,以对特定区域内物体的存在进行分类。R-CNN 是一系列算法,包括 R-CNN,快速 R-CNN 和更快的 R-CNN。
- RetinaNet– 是一个单阶段对象检测模型,它使用焦点损失函数来解决训练期间的类不平衡。RetinaNet 是一个单一的统一网络,由负责计算整个输入图像的卷积特征图的主干网络和两个特定于任务的子网组成。第一个子网对主干网络的输出进行卷积对象分类。第二个子网执行卷积边界框回归。
基于神经网络的对象检测在现代场景中更为普遍,因为它会产生更好的结果并且更先进。
四、设置项目虚拟环境
为应用程序创建隔离的虚拟环境:
- 安装 Python 软件包:
virtualenv$ pip install virtualenv - 创建项目目录:
$ mkdir obj_detection - 导航到新目录:
$ cd obj_detection - 创建虚拟环境:
$ python3 -m venv env这将创建一个名为包含脚本的新文件夹,以控制虚拟环境,包括程序库。
env - 激活虚拟环境:
$ source env/bin/activate
五、安装 TensorFlow
要安装 TensorFlow,请输入以下命令:
$ pip install tensorflow
TensorFlow Object Detection API
TensorFlow Object Detection API 是一个开源框架,可简化构建、训练和部署基于 TensorFlow 构建的对象检测模型的过程。它在其框架中包含一组预先训练的模型 – 称为模型动物园。这些预训练模型在各种数据集上进行训练,包括:
- 上下文中的常见对象 (COCO) – 是一个大规模对象检测、字幕和分割数据集,具有大量功能,包括上下文中的识别、150 万个对象实例和超过 220k 个标记图像。
- 卡尔斯鲁厄理工学院和丰田技术学院(KIITI)是用于自动驾驶和移动机器人的数据集。
安装 TensorFlow Object Detection API
要安装 TensorFlow 对象检测 API,请在项目目录中克隆存储库:
$ git clone https://github.com/tensorflow/models
项目目录中应该有一个模型目录。导航到研究目录:
$ cd models/research
TensorFlow Object Detection API 使用 Protobufs 来配置模型和训练参数。使用 protoc 命令:
$ protoc object_detection/protos/*.proto --python_out=.
安装 COCO API
Thepackage 是 COCO 数据集的官方 API,它是 TensorFlow Object Detection API 的依赖项。要安装,请导航回项目目录:pycocotools
$ cd ../..
克隆cocoapi存储库:
$ git clone https://github.com/cocodataset/cocoapi.git
交换机目录:
$ cd cocoapi/PythonAPI
运行make命令以构建库:
$ make
构建成功运行后,将pycocotools子文件夹从克隆的 TensorFlow 对象检测 API 存储库复制到研究文件夹中:
$ cp -r pycocotools ../../models/research
六、安装对象检测 API
要安装对象检测 API,请在模型/研究文件夹中运行以下命令:
$ cp object_detection/packages/tf2/setup.py . && python -m pip install .
这将安装所有项目依赖项。
七、构建对象检测器
本指南利用在 COCO 数据集上训练的预训练对象检测模型。要开始使用,请在项目目录中创建文件:main.py
$ touch main.py
导入库
通过添加以下行导入所需的库:
import tensorflow as tf

import numpy as np

from PIL import Image

from object_detection.utils import label_map_util

from object_detection.utils import visualization_utils as viz_utils
Numpy用于数组算术和计算,枕头库中的类用于图像处理。从object_detection导入的类具有以下功能:Image
label_map_util:用于加载标签地图以进行绘制。如果对象检测的索引为 1,则标签映射将索引号与类别名称相关联 – 这会将检测映射到人。visualization_utils:包含用于在检测到的对象上叠加标记框的功能。
下载模型
在 COCO 数据集上预先训练的多个模型可以下载并使用,如模型存储库中所列。在本指南中,使用的预训练模型是 SSD ResNet152 V1 FPN 1024×1024(RetinaNet152)。
创建模型下载功能:
def download_model(model_name, model_date):

    base_url = 'http://download.tensorflow.org/models/object_detection/tf2/'

    model_file = model_name + '.tar.gz'

    model_dir = tf.keras.utils.get_file(fname=model_name,

                                        origin=base_url + model_date + '/' + model_file,

                                        untar=True)

    return str(model_dir)
该函数将模型名称和模型日期作为参数,并使用 TensorFlow 中的函数下载指定的模型。它将下载的模型目录作为字符串返回。get_file
使用该函数,下载给定的模型:
# Download model

model_name = "ssd_resnet152_v1_fpn_1024x1024_coco17_tpu-8"

model_date = "20200711"

PATH_TO_MODEL_DIR = download_model(model_name, model_date)
这将下载传递的模型并将模型路径保存到变量。若要加载模型以在应用程序内使用,请添加以下行:
# Load model

model_fn = tf.saved_model.load(PATH_TO_MODEL_DIR + "/saved_model")
该函数从作为参数传递的目录中加载。这将返回一个可跟踪的对象,该对象具有从签名键到函数的签名属性映射。可以像图像上的函数一样调用此对象以进行对象推理。在这里,下载的模型中的 saved_model 目录作为参数传递。loadSavedModel
装载标签
如前所述,标签映射将索引号与类别名称相关联。当检测到的对象返回索引号时,标签映射会对对象进行分类。例如,检测到索引为 1 的对象被归类为人。
要加载用于将索引号与类别名称相关联的标签映射,请添加以下行:
# Load labels

PATH_TO_LABELS = 'models/research/object_detection/data/mscoco_label_map.pbtxt'

category_index = label_map_util.create_category_index_from_labelmap(PATH_TO_LABELS, use_display_name=True)
标签映射文件的路径保存在变量中并传递给函数。此函数读取标签映射并返回一个类别列表,其中包含表示所有可能类别的字典。create _category_index_from_labelmap
加载图像
本指南使用以下图像:
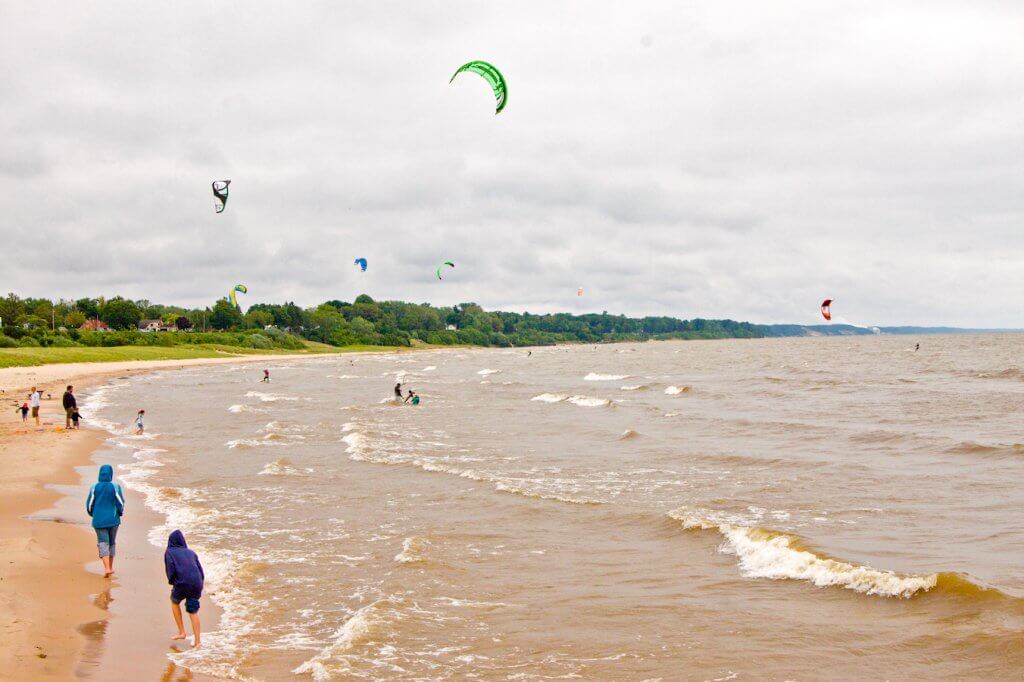

下载图像,分别保存,然后将它们放置在项目目录中。项目目录应如下所示:image1.jpgimage2.jpg
.

├── env/

└── models/

└── cocoapi/

└── main.py

└── image1.jpg

└── image2.jpg
将以下行添加到 main.py 文件中:
# Images to run detection

images = ["image1.jpg", "image2.jpg"]


for image in images:

    print(f"Running inference for image - {image}")


    # Load image into a numpy array

    image_np = np.array(Image.open(image))


    # Convert image to tensor

    input_tensor = tf.convert_to_tensor(image_np)


    # Add an axis

    input_tensor = input_tensor[tf.newaxis, ...]
使用 Image.open 函数,使用 numpy 中的数组函数打开图像并将其加载到 numpy 数组中。对象检测器将张量作为输入,因此必须使用函数将图像转换为张量。当模型需要一批图像时,还会添加新轴。convert_to_tensor
运行推理
要从图像推断对象,请添加以下行:
    # Run inference

    detections = model_fn(input_tensor)
以输入张量作为参数调用模型,这将通过模型运行张量,并且进行检测,以张量批次的形式返回输出,标记检测到的对象的边界。
    # Outputs are tensor batches.

    # Convert to numpy arrays, and take index [0] to remove the batch dimension.

    num_detections = int(detections.pop('num_detections'))

    detections = {key: value[0, :num_detections].numpy()

                  for key, value in detections.items()}

    detections['num_detections'] = num_detections


    # detection_classes cast as ints.

    detections['detection_classes'] = detections['detection_classes'].astype(np.int64)
上面的行将张量批处理转换为 numpy 数组,删除不需要的批处理维度,并在清理后更新检测次数。然后,检测类从其浮点表示形式转换为整数。
可视化检测
要在图像中检测到的对象周围绘制框,请添加以下行:
    image_np_with_detections = image_np.copy()


    viz_utils.visualize_boxes_and_labels_on_image_array(

            image_np_with_detections,

            detections['detection_boxes'],

            detections['detection_classes'],

            detections['detection_scores'],

            category_index,

            use_normalized_coordinates=True,

            max_boxes_to_draw=200,

            min_score_thresh=.30,

            agnostic_mode=False,

            line_thickness=8)
使用复制方法制作图像的副本,并且函数 – 使用格式化的标签名称和分数在图像上覆盖标记的框。它需要 5 个参数:visualize_boxes_and_labels_on_image_array
- 图像 – 要用框作为 uint8 numpy 数组覆盖的图像。
- 盒子 – 形状为 [N, 4] 的 numpy 数组。
- 类 – 一个形状为 [N] 的 numpy 数组。类索引与标签映射中的键匹配,并且从 1 开始。
- 分数 – 形状 [N] 或无的 numpy 数组。如果设置为 None,则该函数假定要绘制的框是真实值,并且还将没有类或分数的框绘制为黑色。
- 类别索引 – 包含由索引 ID 和类别名称组成的类别字典的字典,按索引键控。
所需的参数与其他可选参数一起传递。在此示例中,使用可选参数,要绘制的最大框数设置为 200,线条粗细设置为 8。
使用检测保存图像
若要使用表示检测的覆盖框保存图像,请添加以下行:
    # Save image with detections

    img = Image.fromarray(image_np_with_detections)

    img_filename = image[0:-4] + "_detect" + image[-4:]

    img.save(img_filename)
新图像将保存 _detect 附加到其原始名称。
八、最终代码
作为参考,完整代码:
import tensorflow as tf

import numpy as np

from PIL import Image

from object_detection.utils import label_map_util

from object_detection.utils import visualization_utils as viz_utils


def download_model(model_name, model_date):

    base_url = 'http://download.tensorflow.org/models/object_detection/tf2/'

    model_file = model_name + '.tar.gz'

    model_dir = tf.keras.utils.get_file(fname=model_name,

                                        origin=base_url + model_date + '/' + model_file,

                                        untar=True)

    return str(model_dir)


# Download model

model_name = "ssd_resnet152_v1_fpn_1024x1024_coco17_tpu-8"

model_date = "20200711"

PATH_TO_MODEL_DIR = download_model(model_name, model_date)


# Load model

model_fn = tf.saved_model.load(PATH_TO_MODEL_DIR + "/saved_model")


# Load labels

PATH_TO_LABELS = 'models/research/object_detection/data/mscoco_label_map.pbtxt'

category_index = label_map_util.create_category_index_from_labelmap(PATH_TO_LABELS, use_display_name=True)


# Images to run detection

images = ["image1.jpg", "image2.jpg"]


for image in images:

    print(f"Running inference for image - {image}")


    # Load image into a numpy array

    image_np = np.array(Image.open(image))


    # Convert image to tensor

    input_tensor = tf.convert_to_tensor(image_np)


    # Add an axis

    input_tensor = input_tensor[tf.newaxis, ...]


    # Run inference

    detections = model_fn(input_tensor)


    # Outputs are tensor batches.

    # Convert to numpy arrays, and take index [0] to remove the batch dimension.

    num_detections = int(detections.pop('num_detections'))

    detections = {key: value[0, :num_detections].numpy()

                  for key, value in detections.items()}

    detections['num_detections'] = num_detections


    # detection_classes cast as ints.

    detections['detection_classes'] = detections['detection_classes'].astype(np.int64)


    image_np_with_detections = image_np.copy()


    viz_utils.visualize_boxes_and_labels_on_image_array(

            image_np_with_detections,

            detections['detection_boxes'],

            detections['detection_classes'],

            detections['detection_scores'],

            category_index,

            use_normalized_coordinates=True,

            max_boxes_to_draw=200,

            min_score_thresh=.30,

            agnostic_mode=False,

            line_thickness=8)


    # Save image with detections

    img = Image.fromarray(image_np_with_detections)

    img_filename = image[0:-4] + "_detect" + image[-4:]

    img.save(img_filename)
九、运行代码
若要运行代码,请从项目目录中输入以下命令:
$ python main.py
输出:
Downloading data from http://download.tensorflow.org/models/object_detection/tf2/20200711/ssd_resnet152_v1_fpn_1024x

1024_coco17_tpu-8.tar.gz

504180168/504180168 [==============================] - 133s 0us/step


Running inference for image - image1.jpg

Running inference for image - image2.jpg
代码成功下载模型并从图像推断对象。在项目目录中,存在保存的对象检测到的图像:
.

├── env/

└── models/

└── cocoapi/

└── main.py

└── image1.jpg

└── image1_detect.jpg

└── image2.jpg

└── image2_detect.jpg
打开新映像:

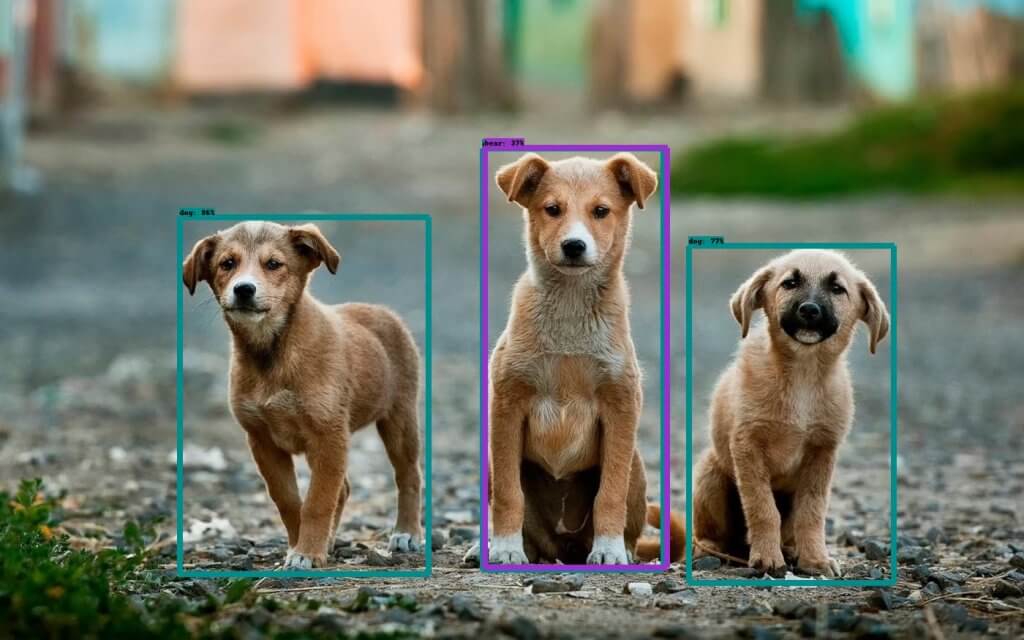
在第一张图像中,物体检测器正确标记了所有物体,而在第二张图像中,它识别了 3 只动物,但由于特征惊人地相似,将中间的狗归类为熊。
十、总结
本指南介绍了对象检测以及如何在 TensorFlow 中构建对象检测器。